IIJ Studio TOKYOの困ったをITで解決 ~初めてのNode-REDでリモートカメラコントローラーとATEMを連動 ~
2024年04月10日 水曜日
CONTENTS
IIJ Studio TOKYOでオペレーションをしていると、人力でできなくはないがオペミスに繋がるからITの力で簡単に安全な環境を作りたいと思う事が度々あります。
そんな困ったを今回は、Raspberry Pi 4 でNode-REDを動かして解決したお話です。
困ったは突然
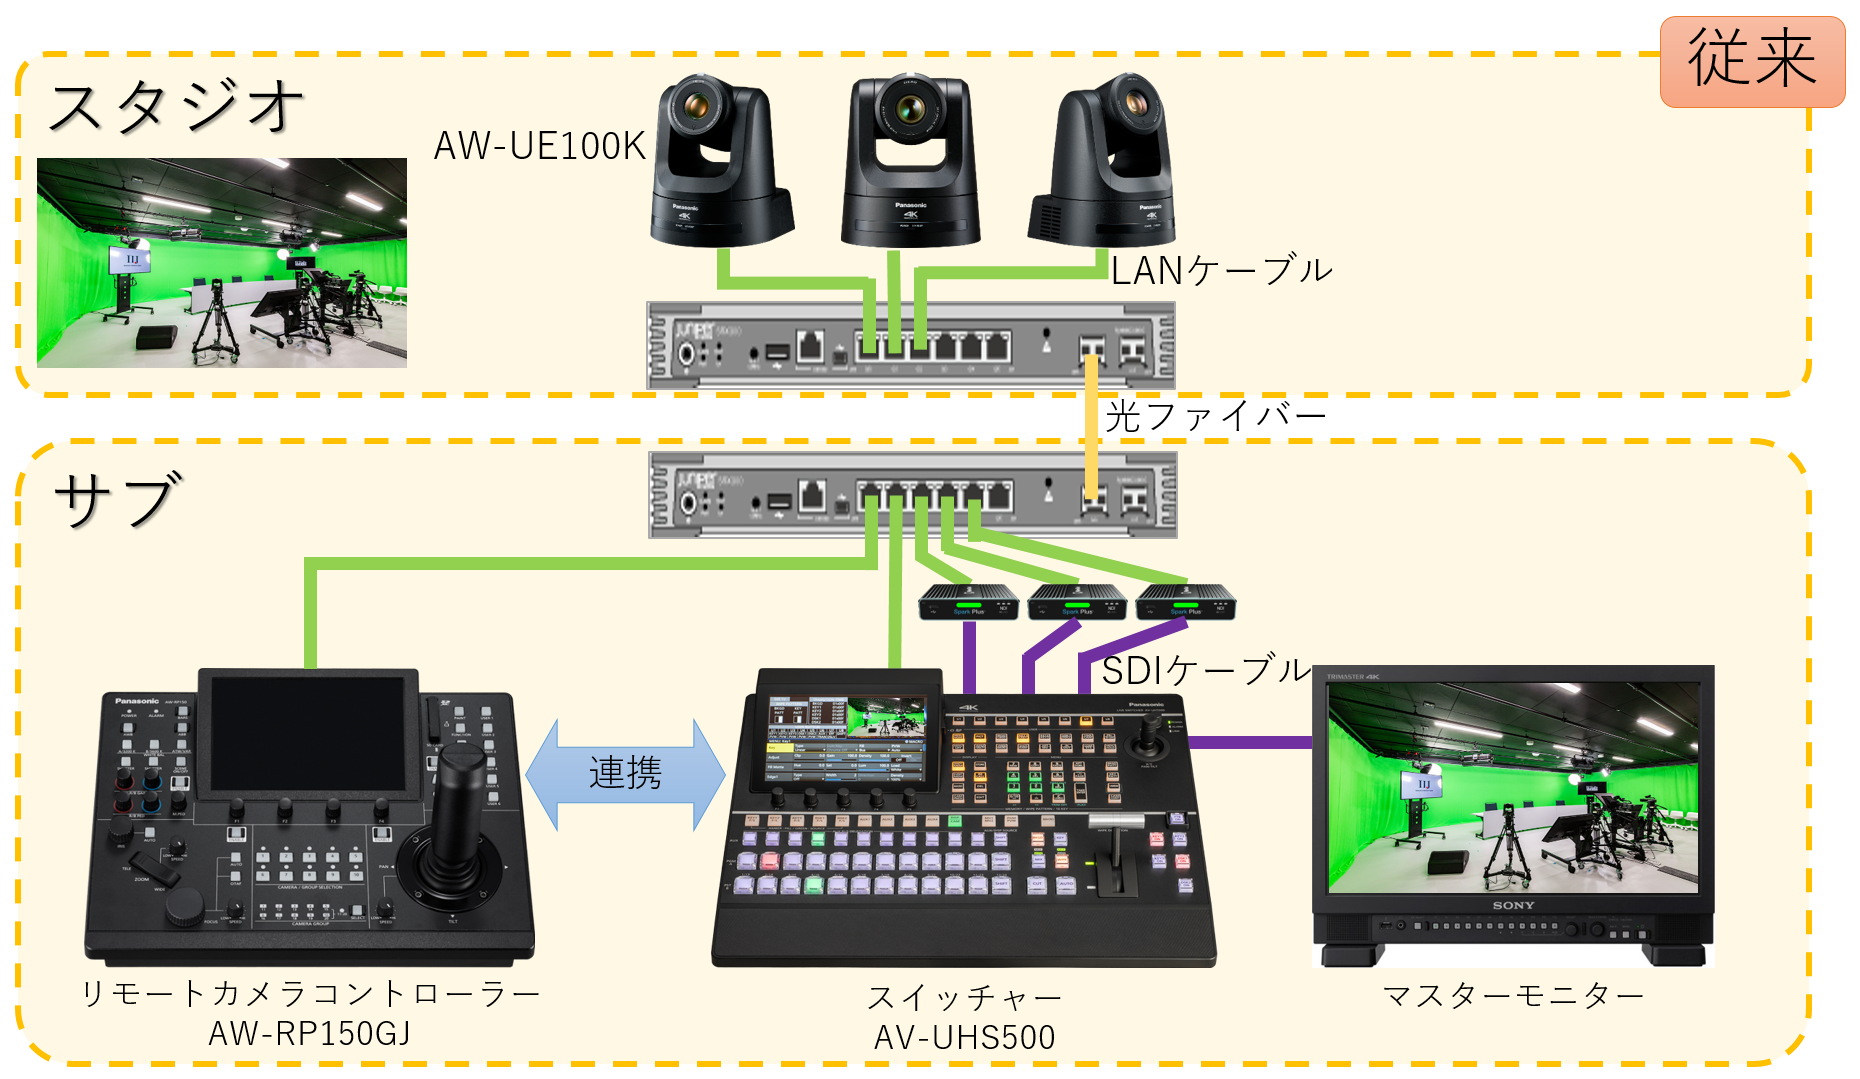
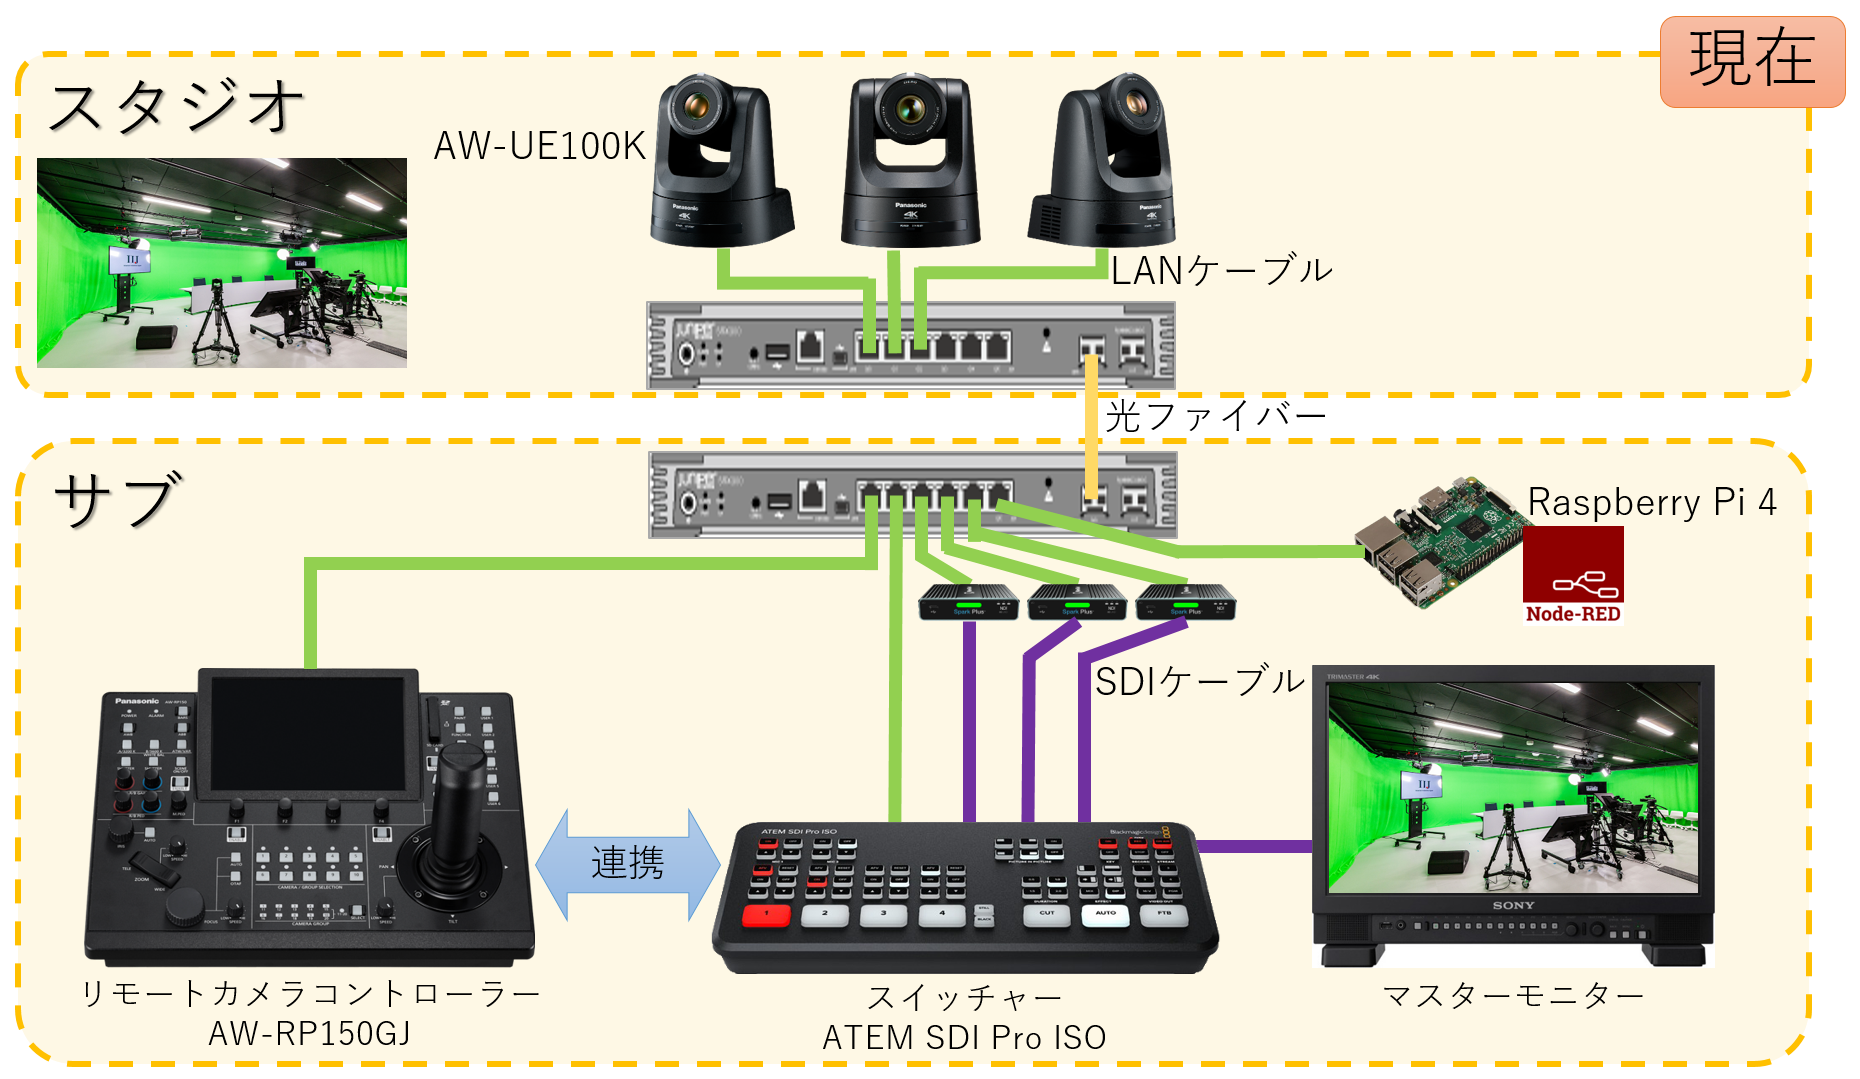
3-4月には大型イベントで社内の配信機材は一部を社外に持ち出します。
その中にパナソニック製のスイッチャー(AV-UHS500)も含まれていました。

スタジオでは複数のリモートカメラ(AW-UE100K)をリモートカメラコントローラー(AW-RP150GJ)で制御しています。
その際に、リモートカメラコントローラーのカメラ選択に連動してスイッチャー(AV-UHS500)の出力を自動で変更する設定を入れてマスターモニターの映像をシームレスに切り替えています。
※カメラの色調整では切り替え時に断が発生すると色合わせが困難でシームレスな切り替えが必要になりスイッチャーが必要となります。
やりたい事
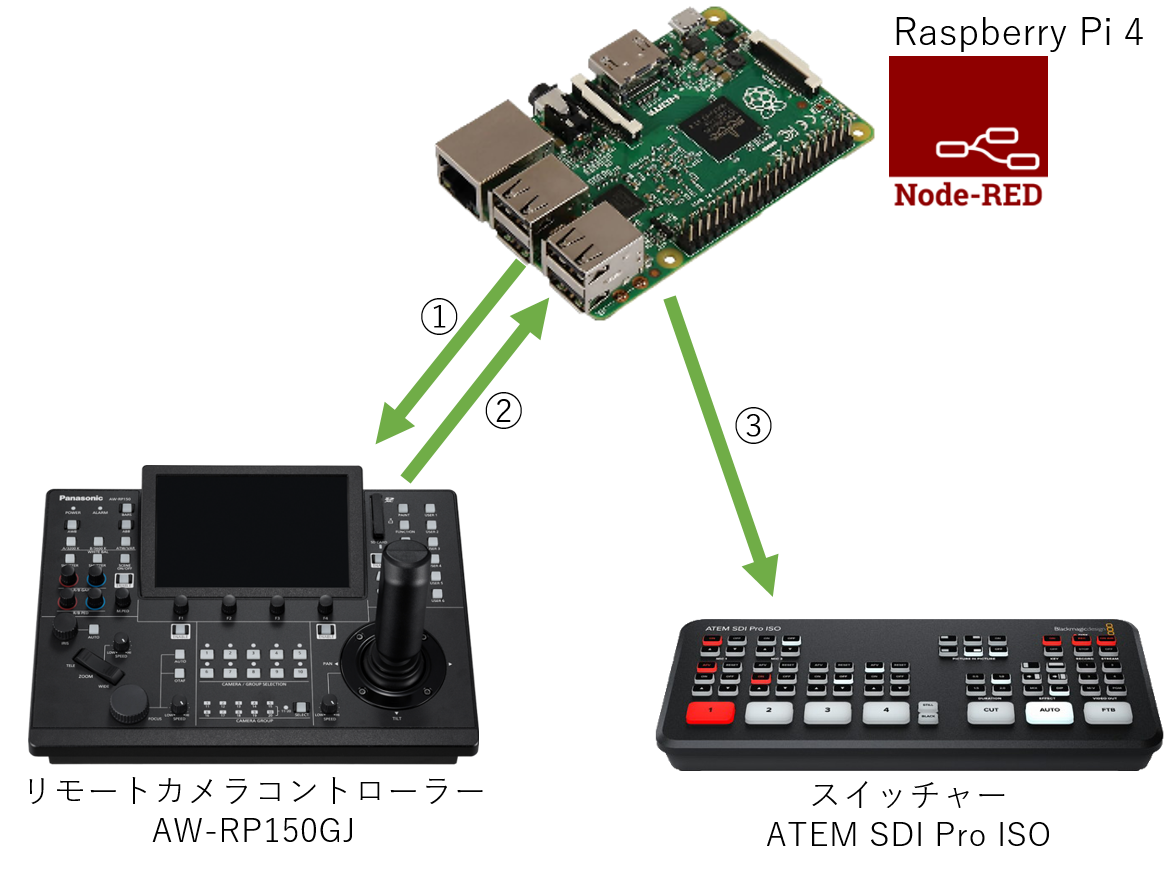
- Node-REDが起動後0.5秒毎にフローを実行
- Node-REDからAW-UE100Kへカメラの選択番号を問い合わせ(図の①)
- AW-UE100KがNode-REDへ選択番号を返す(図の②)
- Node-REDからATEM SDI Pro ISOへPGMのソース切り替えを指示(図の③)
Node-REDのインストール
Raspberry Pi 4 へのOSインストールは割愛します。(Raspberry Pi Imagerで普通にインストールしてください)
管理者権限になる
admin@RasPi-Studio-01:~ $ sudo -i
環境をカスタマイズ
root@RasPi-Studio-01:~# vi ~/.vimrc
set nocompatible
set backspace=indent,eol,start

root@RasPi-Studio-01:~# vi .bashrc
alias ll='ls $LS_OPTIONS -l'
Node-REDのインストール
root@RasPi-Studio-01:~# apt update
root@RasPi-Studio-01:~# apt upgrade

root@RasPi-Studio-01:~# wget https://raw.githubusercontent.com/node-red/linux-installers/master/deb/update-nodejs-and-nodered
root@RasPi-Studio-01:~# bash update-nodejs-and-nodered --node20
Running Node-RED install for user root at /root on ubuntu


This can take 20-30 minutes on the slower Pi versions - please wait.

  Stop Node-RED                       ?
  Remove old version of Node-RED      ?
  Remove old version of Node.js       ?
  Install Node 20.11.1-1nodesource1   ?   v20.11.1   Npm 10.2.4
  Clean npm cache                     ?
  Install Node-RED core               ?   3.1.7
  Move global nodes to local          -
  Npm rebuild existing nodes          ?
  Install extra Pi nodes              ?
  Add shortcut commands               ?
  Update systemd script               ?


Any errors will be logged to   /var/log/nodered-install.log
All done.
You can now start Node-RED with the command  node-red-start
  or using the icon under   Menu / Programming / Node-RED
Then point your browser to localhost:1880 or http://{your_pi_ip-address}:1880

Started :  2024年  3月 22日 金曜日 09:10:01 JST
Finished:  2024年  3月 22日 金曜日 09:10:33 JST

**********************************************************************************
 ### WARNING ###
 DO NOT EXPOSE NODE-RED TO THE OPEN INTERNET WITHOUT SECURING IT FIRST

 Even if your Node-RED doesn't have anything valuable, (automated) attacks will
 happen and could provide a foothold in your local network

 Follow the guide at https://nodered.org/docs/user-guide/runtime/securing-node-red
 to setup security.

 ### ADDITIONAL RECOMMENDATIONS ###
  - You can customise the initial settings by running:

      node-red admin init

  - After running Node-RED for the first time, change the ownership of the settings
    file to 'root' to prevent unauthorised changes:

      sudo chown root:root ~/.node-red/settings.js

  - Do not run Node-RED as root or an administraive account

**********************************************************************************


Node-RED Settings File initialisation
=====================================
This tool will help you create a Node-RED settings file.

? Settings file ・ /root/.node-red/settings.js

User Security
=============
? Do you want to setup user security? ・ Yes
? Username ・ admin
? Password ・ ********************
? User permissions ・ full access
? Add another user? ・ No

Projects
========
The Projects feature allows you to version control your flow using a local git repository.

? Do you want to enable the Projects feature? ・ Yes
? What project workflow do you want to use? ・ manual - you must manually commit changes

Editor settings
===============
? Select a theme for the editor. To use any theme other than "default", you will need to install @node-red-contrib-themes/theme-collection in your Node-RED user directory. ・ default

? Select the text editor component to use in the Node-RED Editor ・ monaco (default)

Node settings
=============
? Allow Function nodes to load external modules? (functionExternalModules) ・ Yes


Settings file written to /root/.node-red/settings.js
※インストールログをブログに載せるために、上記は別環境で実行した内容です。
自動起動設定
root@RasPi-Studio-01:~# systemctl enable nodered.service
再起動してNode-REDが自動起動する事を確認します。
Node-REDの設定
ブラウザで http://{IPアドレス}:1880/ でログイン
※初期設定はウィザードに従ってください。
必要なノードの追加
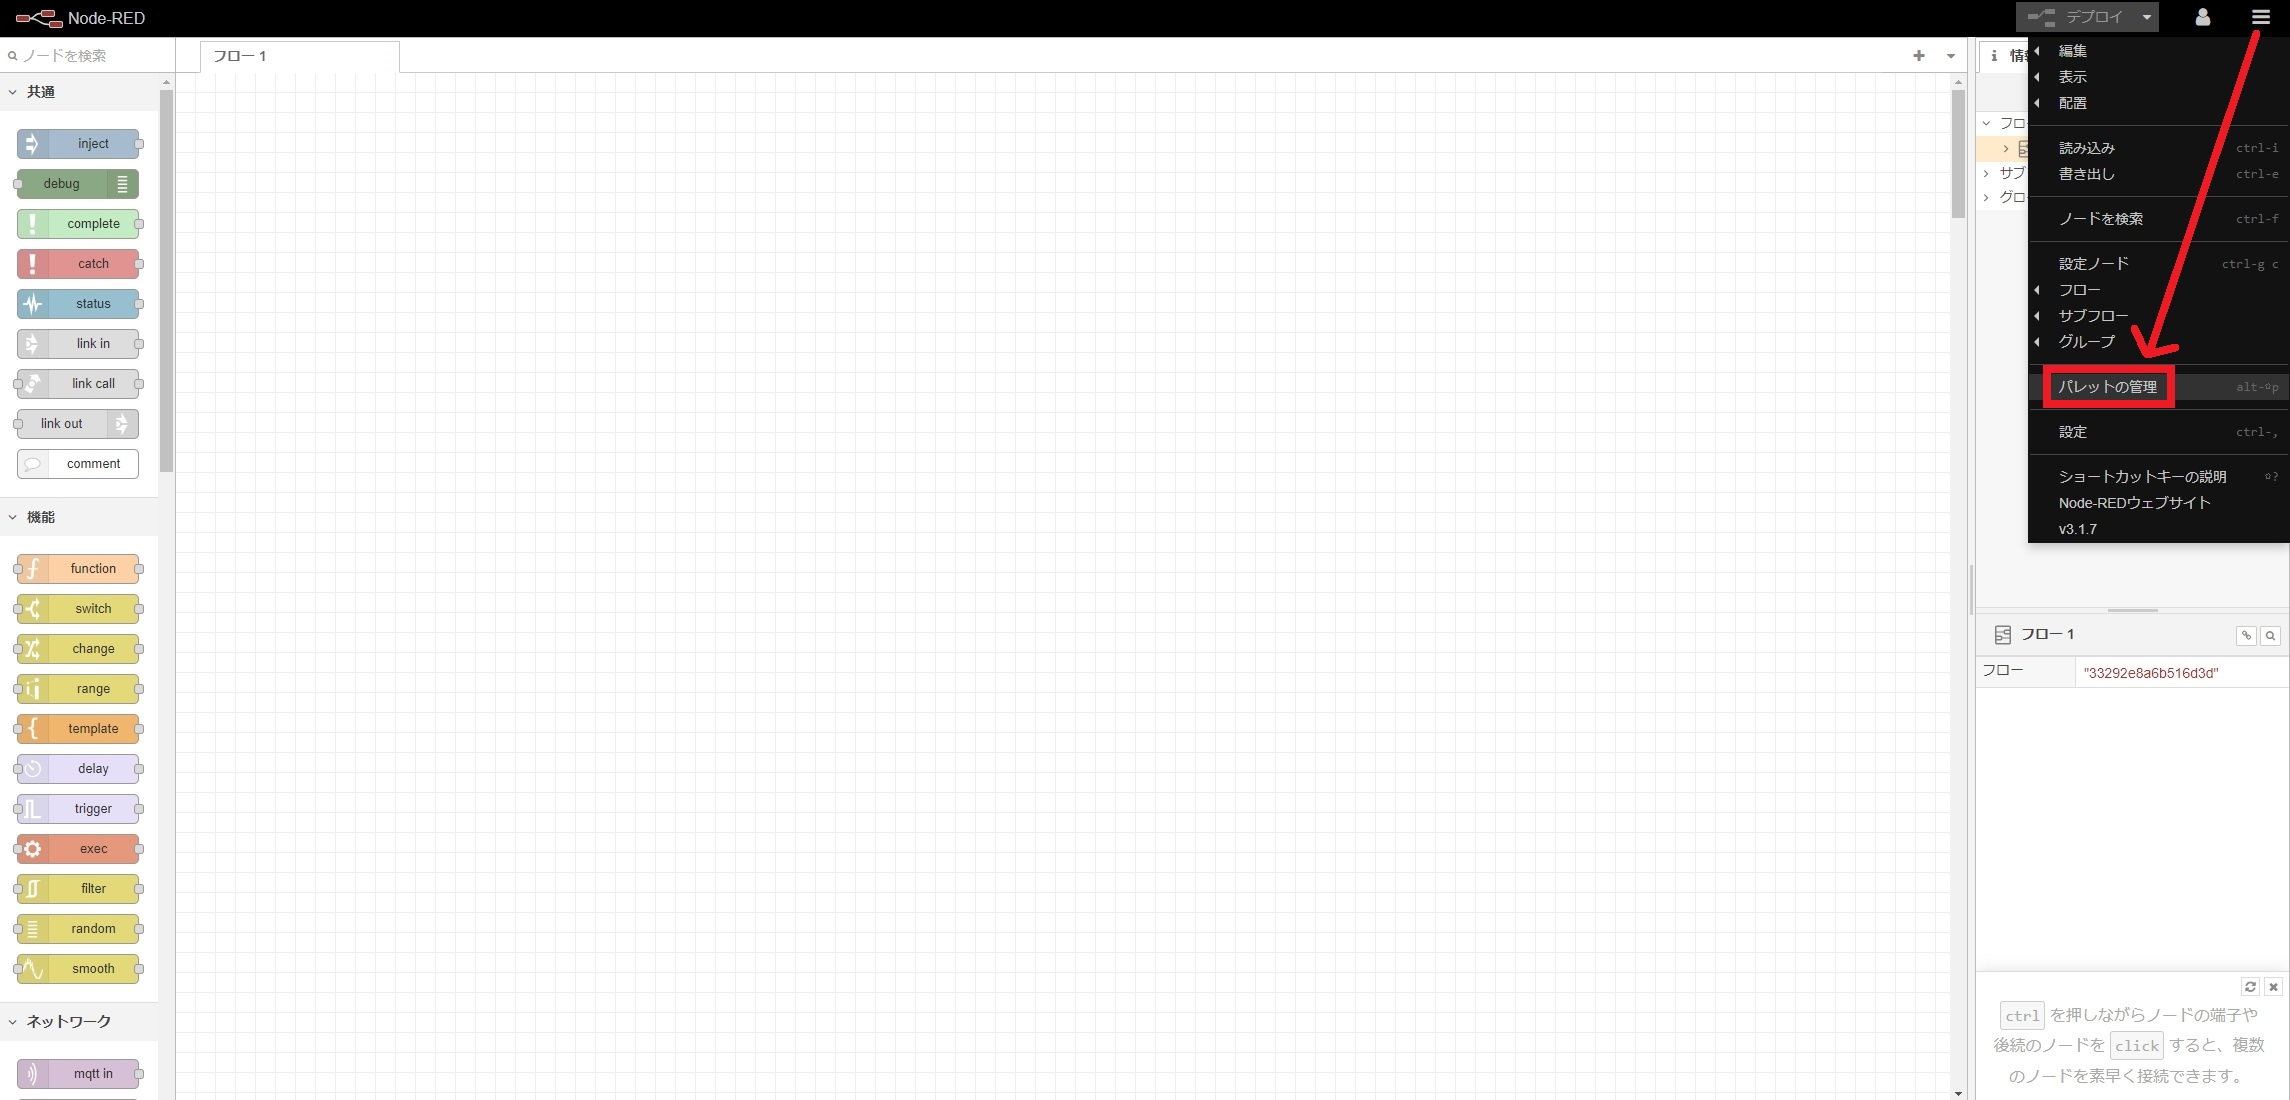
右上のメニューから「パレットの管理」をクリック
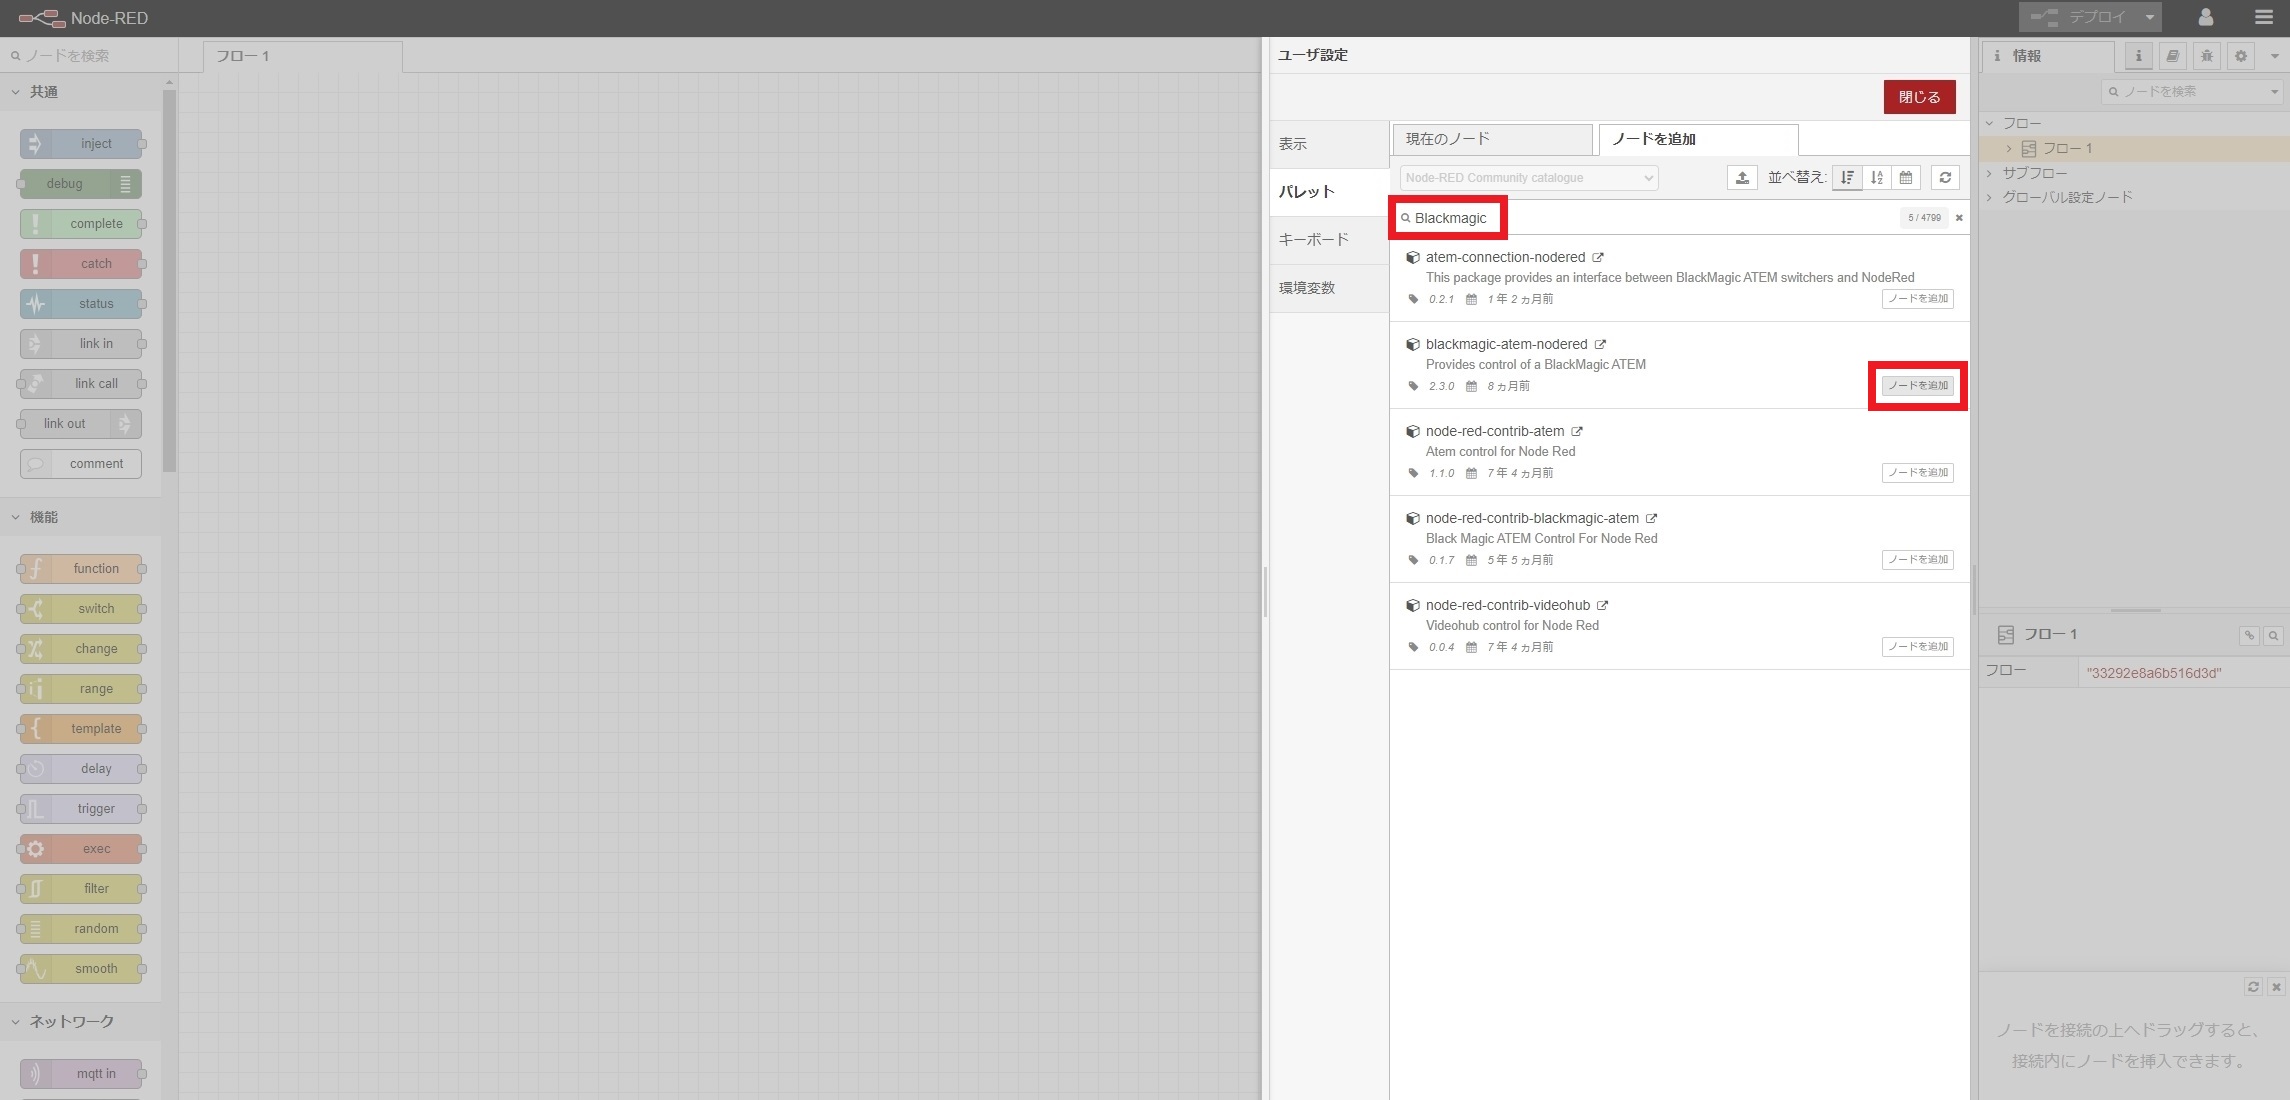
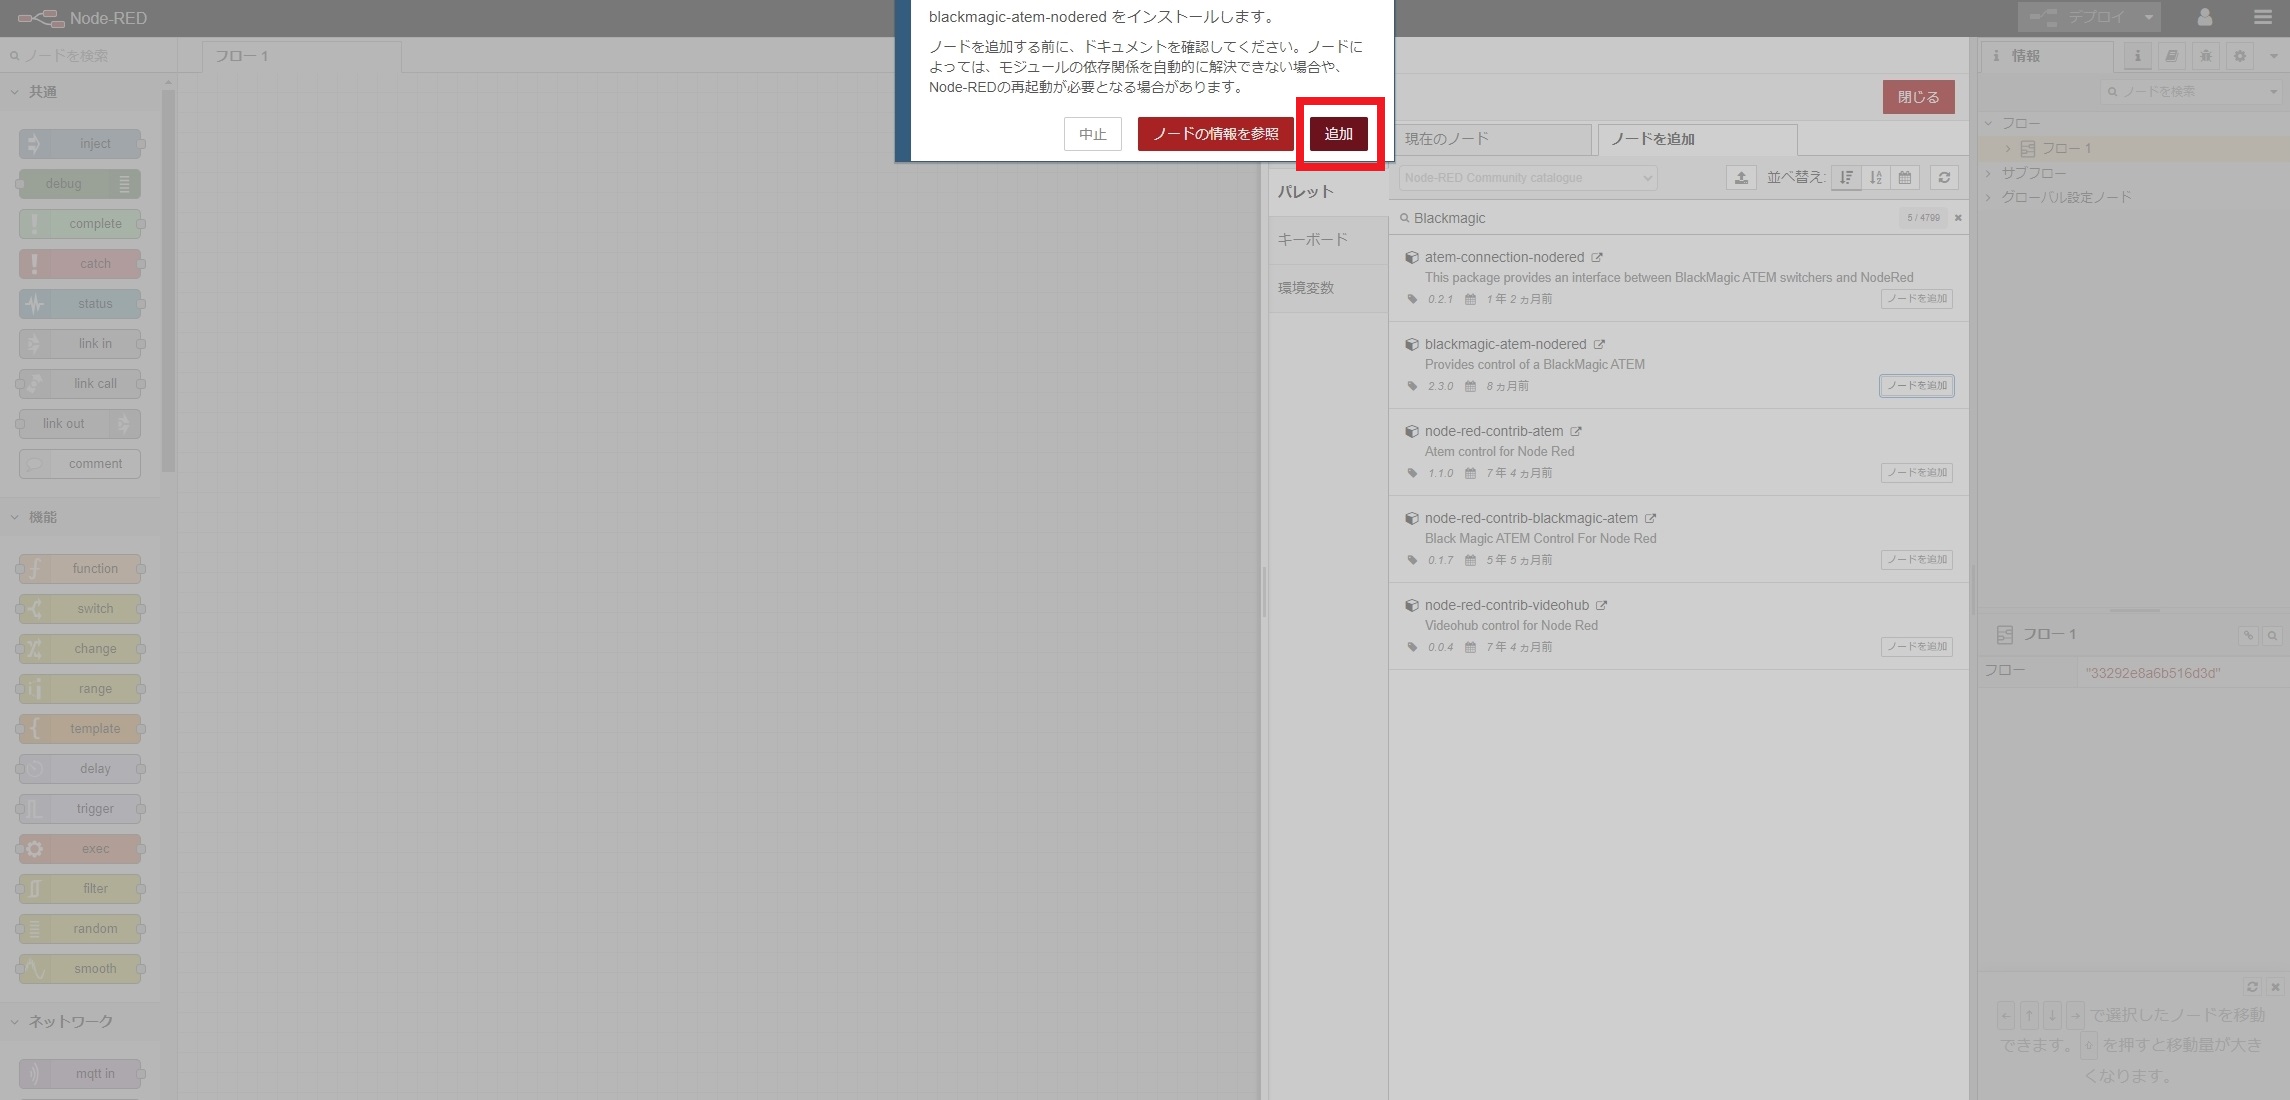
「Blackmagic」と検索してATEMのノードを追加
左のノードから選んで並べ線で繋げます。
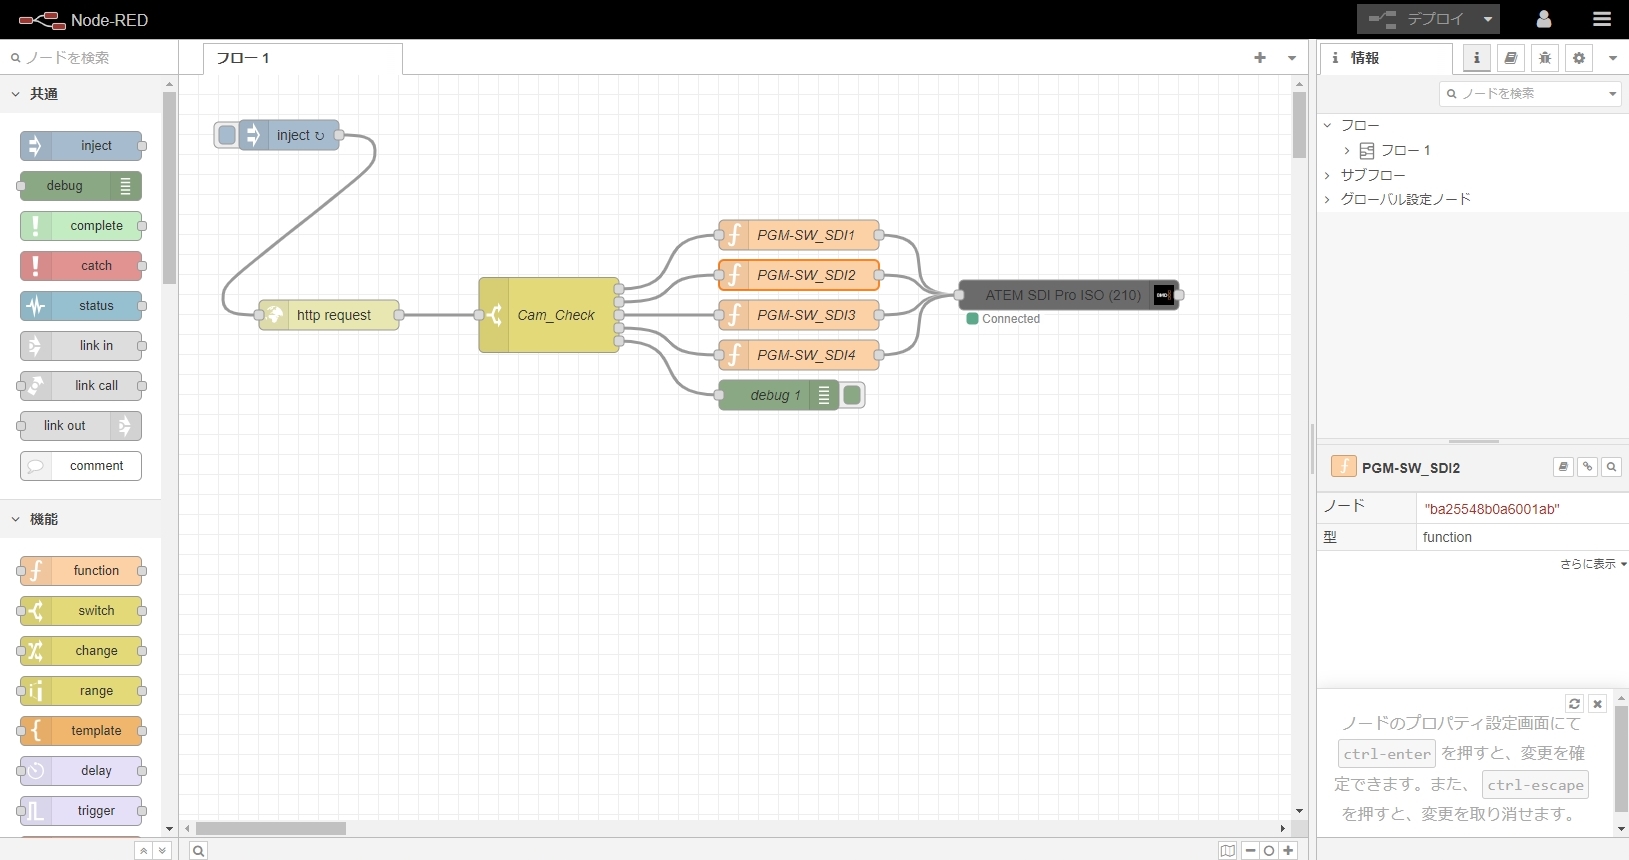
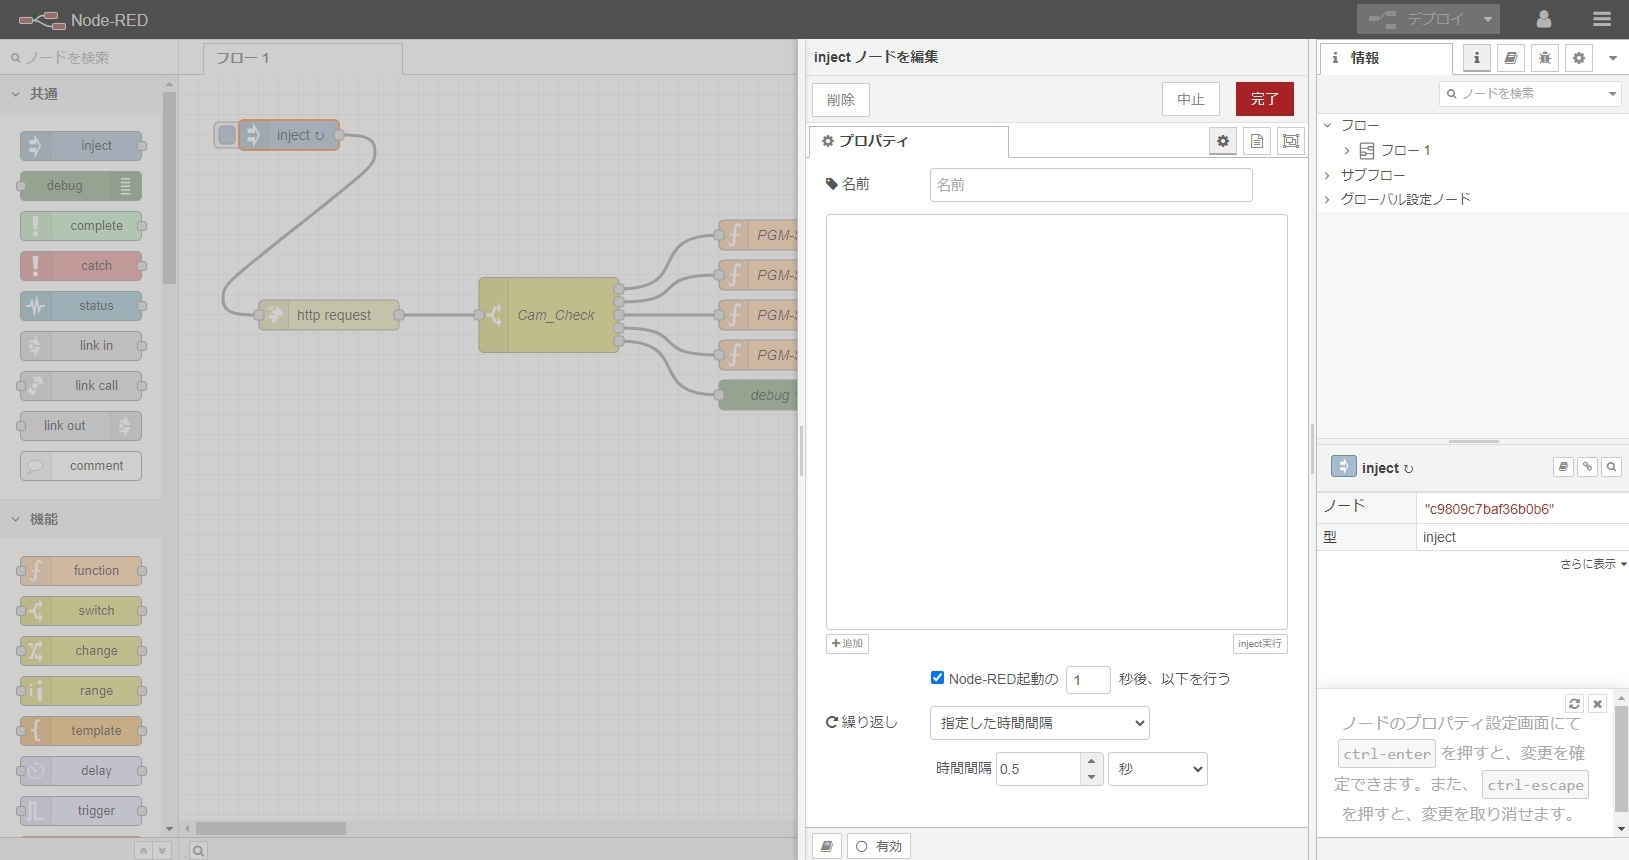
[inject]ノードの不要な初期設定を消して起動と繰り返し設定を有効にします。
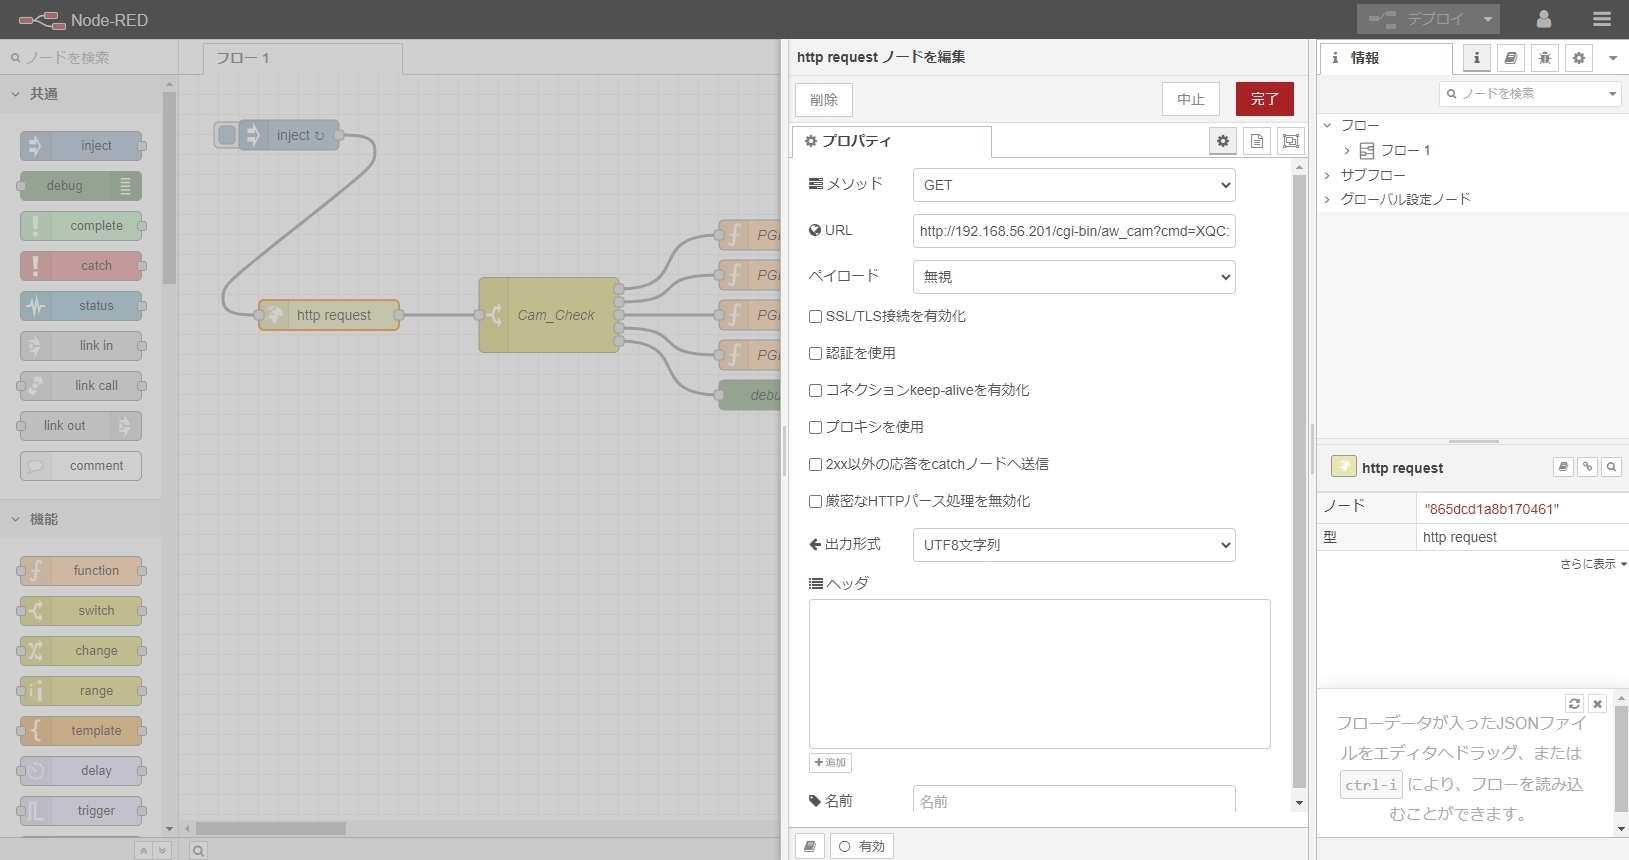
[http request]でカメラコントローラーに選択カメラ番号を問い合わせます。
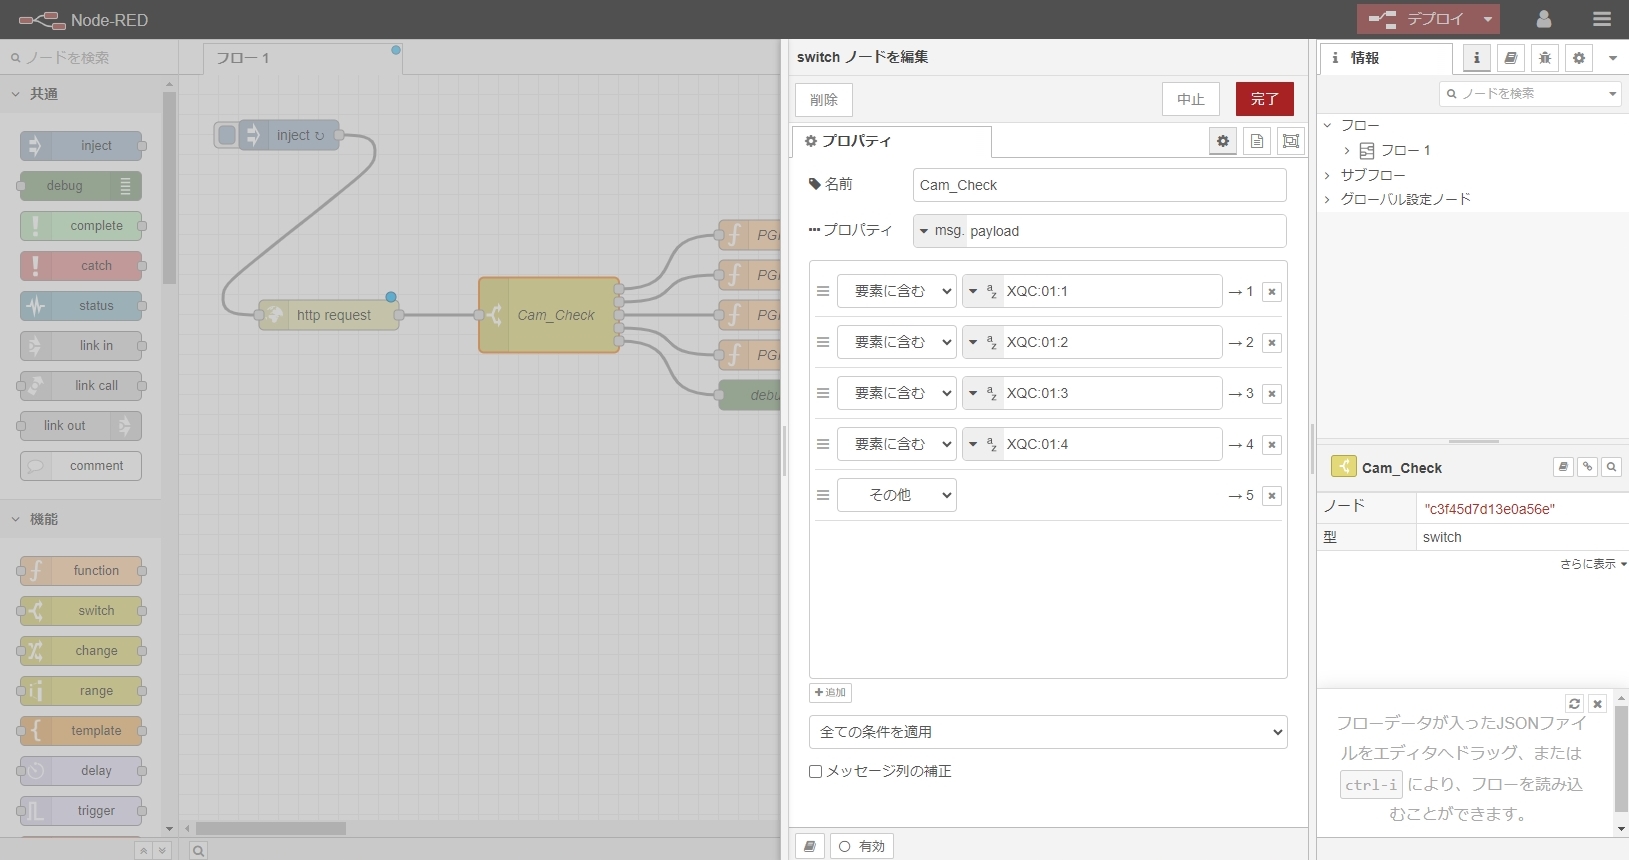
[switch]でカメラコントローラーからの戻り値に応じた次の処理を決定します。
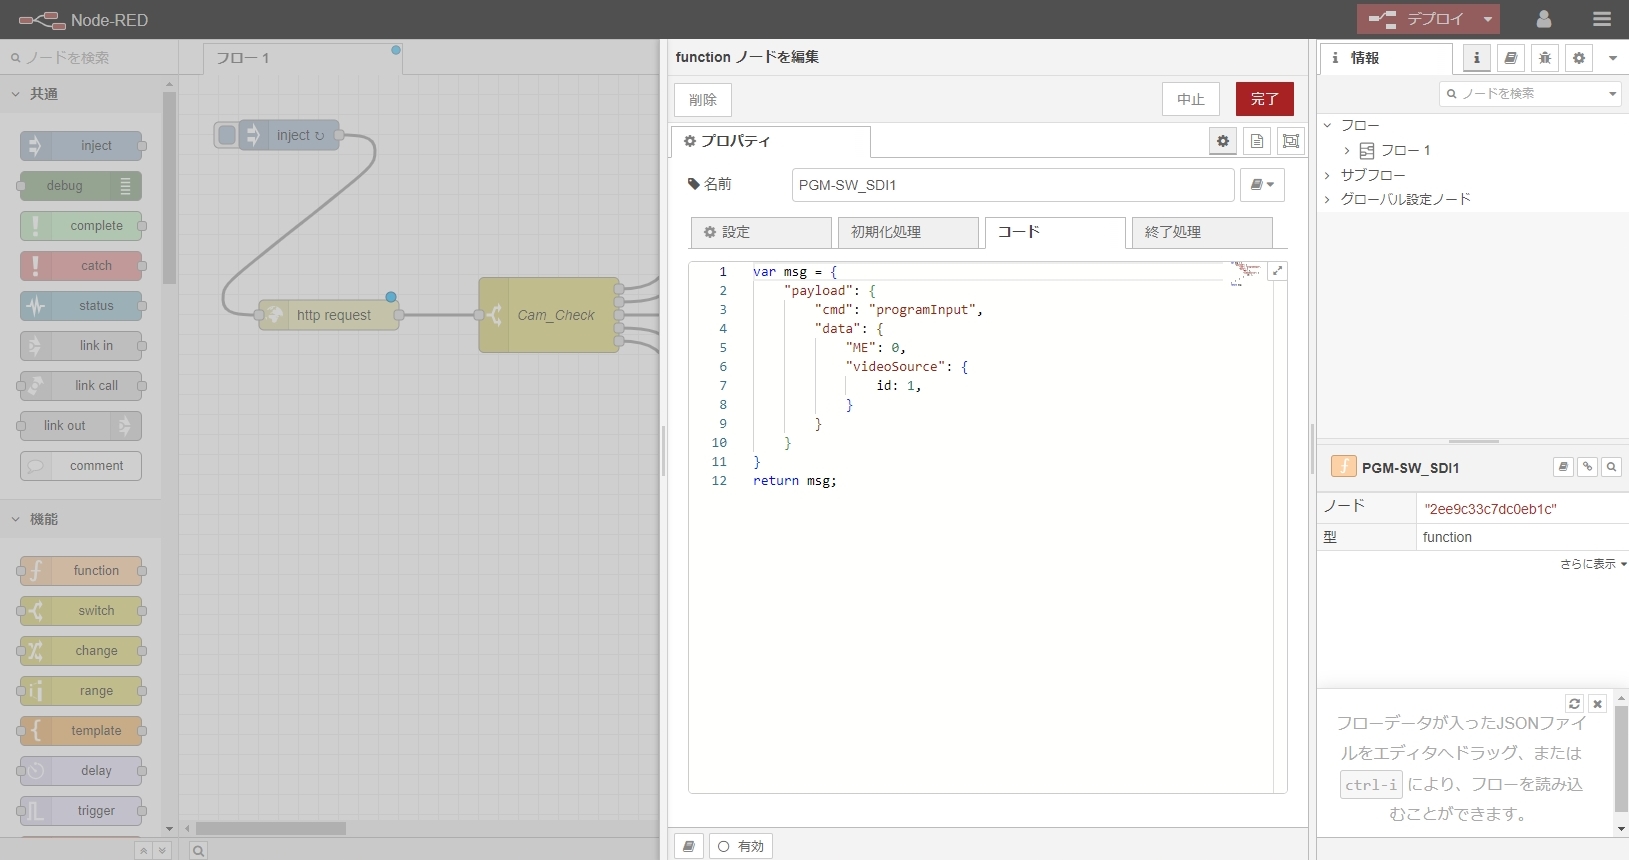
[function]でATEMに送る指示を記述します。
[ATEM]でATEM SDI Pro ISO にプログラム切り替えの指示を送ります。
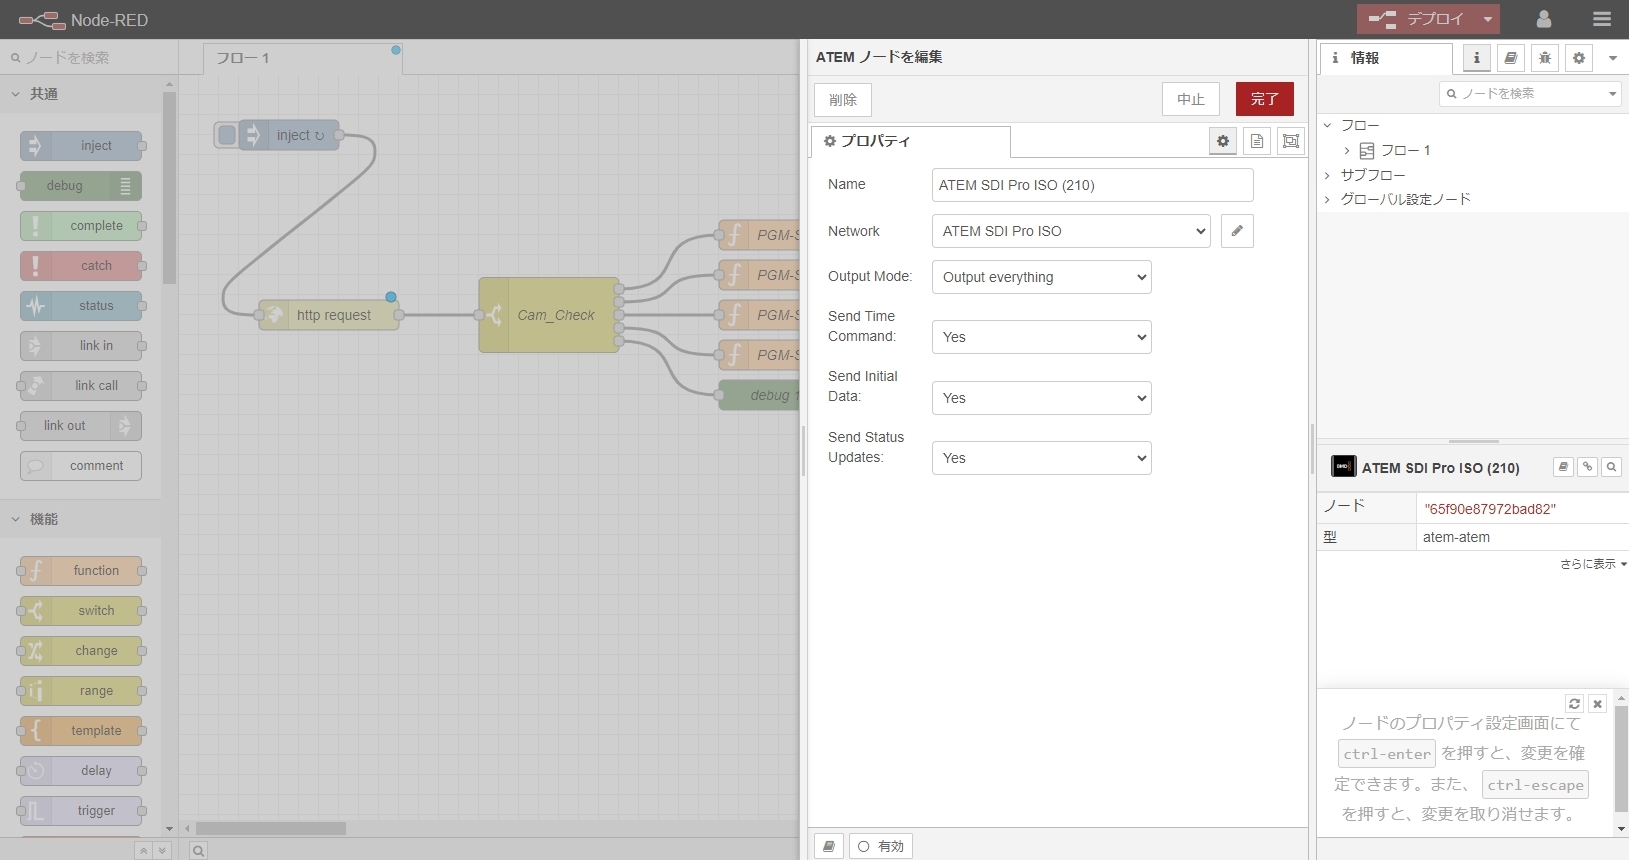
最後に右上の「デプロイ」ボタンを押すと実行されます。
実際の使用動画
リモートカメラコントローラー(AW-RP150GJ)とスイッチャー(ATEM SDI Pro ISO)のボタン連動動画
リモートカメラコントローラーに連動してスイッチャーのPGMが切り替わる動画
本記事で使用した画像に関する引用元一覧
- https://connect.panasonic.com/
- https://www.sony.jp/
- https://tricaster.jp/
- https://www.blackmagicdesign.com/
- https://www.raspberrypi.com/
- https://nodered.org/
筆者の個人ブログ:https://blog.mlnpn.net/
| 執筆者X(旧Twitter) | @ryota_imanishi |


![「Network Stomper開発 Project 基板設計記[第3回(全5回)]」のイメージ](https://eng-blog.iij.ad.jp/wp-content/uploads/2019/10/6bae6845cb53172d02351d066186c023-300x169.png)